


 marketing@expomax.com.cn




RGB SEG Lightbox Display: A Step-by-Step Tool-Free Assembly Guide
An RGB SEG lightbox display does not usually fail on the show floor because the LEDs are wrong. It fails because a joint was not fully seated, an electrical contact was not aligned, or a graphic was pressed into the channel from one corner and stretched across to the other. Three symptoms, one root cause: the frame was built without knowing how the power and the tension actually travel through it.

This guide covers that. It walks through the frame build in the order that works, explains where the power runs and why there is no cable to route at each joint, and then covers the part most setup videos skip — how to configure the lighting so the display reads as a brand asset rather than a fairground attraction.
It is written for the people who assemble these units for real: exhibition contractors building six booths in two days, retail teams installing a window for a quarter, and distributors demonstrating an RGB LED edge frame display to their own dealers.
1. What Actually Sits Inside the Frame
Inside any RGB SEG lightbox display, four components do all the work — and each one has a counterpart you should check on any competing quote.
1.1 The Profile
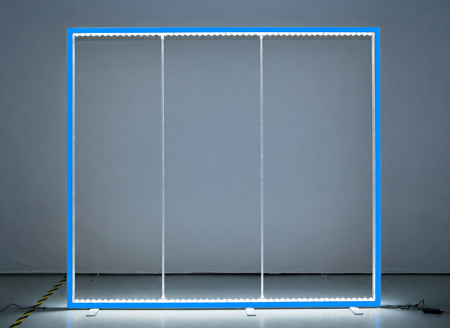
On the EXPOMAX RGB series it is an 80 mm (3.15 in) aluminium extrusion. Depth is not cosmetic: it sets how much of the LED module sits behind the border, how rigid a 3 m span is, and how much the frame weighs per section. A 40–60 mm profile will not behave like an 80 mm one at height.
1.2 The Graphic Channel
A continuous groove around the inner edge. The silicone strip sewn to the fabric is pressed into it by hand, which is what produces the frameless, tensioned finish that SEG is bought for. There are no clips, no magnets and no visible fixings.
1.3 The Joints
Push-to-lock connectors paired with spring-loaded electrical contacts. The mechanical lock and the electrical connection happen in the same action — this is the part that separates a modern RGB LED edge frame display from a static frame that has been retrofitted with LED strips and a wiring loom.
1.4 The Power Supply
Built into the frame rather than carried as an external transformer. One consequence that shows up on every site: one mains lead per display, and no transformer to tape to a leg or hide behind a counter.
14.5 The Fabric
The fabric itself matters as much as the hardware. Standard backlit stock is BL16 SEG fabric with a B1 fire-resistant rating — the certificate that decides access at a large number of venues, and one of the first documents an exhibition contractor will ask for.
2. The Decision That Comes Before Assembly: Edge-Only or Hybrid
The range splits on one question. Does the artwork need to be lit, or does the frame only need to carry colour?
| Specification | RGB Flash Frame EM-22AA | RGB Flash Lightbox EM-22AB |
|---|---|---|
| Lighting | RGB edge lighting only | RGB edge columns plus internal LED strips |
| Does the graphic glow? | No — perimeter only | Yes, both sides |
| Sides | Single or double-sided SEG | Double-sided backlit SEG |
| Profile | 80 mm aluminium | 80 mm aluminium |
| Sizes | 39.37 in wide × 39.37 / 78.74 / 88.58 / 98.43 in high | Same four sizes |
| Packed weight | 24.25 lb (39.37 × 39.37) to 50.70 lb (39.37 × 98.43) | Same carton, same weights |
| Choose it when | You want colour and silhouette without illumination — dark rooms, night events, stage edges, photo backdrops | The artwork carries the message and must read in a bright hall |
Two specification details decide more projects than any marketing claim.
Lighting Direction Changes with Width
On a 1 m wide frame, RGB lighting is applied from the left and right sides. On larger sizes it moves to the top and bottom to keep the perimeter even. If you are specifying a run of narrow frames and expecting identical light distribution along it, this is why you will not get it.
Edge-Only Does Not Scale the Same Way
The RGB Flash Frame EM-22AA is offered at 39.37 in width. Where a project needs 1.5 m and above, the answer is an RGB Flash Lightbox at a larger standard width — and that is a different lighting configuration, not just a bigger version of the same thing.
3. Size, Weight and Packing Reference
Logistics kill RGB display projects more often than lighting does, so here is the reference table worth sending to a freight forwarder before anyone signs.
| Width Family | Height (in) | Net Weight (lb) | Gross Weight (lb) | Carton (in) |
|---|---|---|---|---|
| 39.37 in (EM-22AA / EM-22AB) | 39.37 | — | 24.25 | 14.96 × 11.02 × 44.09 |
| 78.74 | — | 46.30 | 14.96 × 11.02 × 44.09 | |
| 88.58 | — | 48.50 | 14.96 × 11.02 × 44.09 | |
| 98.43 | — | 50.70 | 14.96 × 11.02 × 44.09 | |
| 59.06 in | 78.74 | 40.68 | 60.58 | 15.35 × 14.96 × 44.09 |
| 88.58 | 42.95 | 62.85 | 15.35 × 14.96 × 44.09 | |
| 98.43 | 45.22 | 65.12 | 15.35 × 14.96 × 44.09 | |
| 78.74 in | 78.74 | 45.22 | 65.12 | — |
| 88.58 | 47.49 | 67.40 | — | |
| 98.43 | 49.76 | 69.67 | — |
Three things this table is actually for.
It Keeps a Distributor on One Shelf Position
The entire 39.37 in family shares a single carton of 14.96 × 11.02 × 44.09 in across all four heights. Four SKUs, one footprint — which is why a dealer can quote a size matrix instead of stocking one size and apologising for the rest.
It Sets the Courier Band, and the Band Sets the Margin
Moving from 50.70 lb to 60.58 lb crosses a dimensional and weight threshold that changes the per-unit freight number, and on a multi-unit order that difference is the whole profit.
It Tells You the Labour
A 69.67 lb carton is a two-person lift with a case in the way. Anything above roughly 60 lb should be planned as a two-person unload, not discovered at the loading dock.
The 118.11 in width format is a separate logistics case: it ships as two protective inner cases packed together in one outer carton, so plan for two pieces and a longer vehicle slot rather than one box.
4. What Is Actually in the Case
Open the EVA wheeled case and inventory before you build, not after:
Numbered aluminium frame sections — base rail, uprights, top rail, and on taller sizes a mid-rail
Corner connectors, plus straight connectors for the chosen width
Feet or base plates
The remote control
A mains lead — one, because the supply is internal
The SEG graphic, rolled, in its own bag
Tape the packing list inside the case lid. It is the cheapest loss-prevention measure in the entire operation, and the first thing a new crew member will look for.
5. Assembly, Step by Step
The tool-free sequence below assumes one frame, no tools at any point, and a floor you are allowed to put a blanket on.
Every profile carries a number or mark. Lay the sections on the floor in the order they will be joined, working face down. Do not start connecting until the layout matches the drawing; most rework happens because two similar-length sections were swapped at this stage.
Connect the base rail to the two uprights first. A three-sided U lies flat and stable, and the fourth side drops in last. Building upright-first with the frame standing is how corners get forced, and a forced corner never sits flush again.
Push-to-lock connectors seat with a positive click and sit flush. A joint that stands 2 mm proud is not seated, even if it feels tight. Run a finger along the inside edge of every corner: any step you can feel will telegraph through the fabric.
The upright that receives the mains inlet must be fully seated before anything is powered. On a counter unit the equivalent step is fitting both LED strips and closing the top.
Add the top rail last, then the feet or base plates. With the frame still face down, check that all four corners are square before lifting.
Measure corner to corner both ways. Equal diagonals mean the frame is square; a difference of 5 mm or more means a joint is not home, and no amount of graphic tension will fix an out-of-square frame. This single check prevents the most common complaint in the category — "the fabric will not sit flat" — and it takes fifteen seconds.
Plug in, switch on, and confirm every section lights. Doing this before the fabric goes in means the joints are still reachable. If one section is dark, return to Step 3: in practice that is the cause far more often than a failed LED strip.
Press the silicone edge of the SEG fabric into the channel at the bottom middle first, then the two bottom corners, then the two top corners, then work the midpoints and finally the long runs. Never stretch from one corner across to the opposite one; that is how a graphic ends up drum-tight in one corner and rippled in the other. Push the edge in with a thumb, not a tool.
The main frame of the 118.11 in system is quoted at approximately three minutes once a team is familiar with it.
The counter unit is designed to go up in under a minute.
First-time builds on a mid-size frame realistically take 15 to 25 minutes with two people, most of it spent reading the drawing and re-seating one corner.
6. How Power Crosses a Joint
This is the section that decides whether you are buying an RGB LED edge frame display or a converted static frame, and it is worth understanding before the purchase order rather than after the first build.
The frame uses push-to-lock mechanical connectors paired with spring-loaded electrical contacts at the joints. When two sections lock, the contacts close and power passes from section to section through the profile itself. There is no jumper cable to plug in at each corner, and no separate wiring loom to dress behind the fabric.
Three consequences follow, and all three are operational rather than cosmetic.
One Mains Lead per Frame
The supply is internal, so the display plugs into the wall with a single cord. A booth with four lit frames runs four leads instead of four leads plus eight jumpers — and nothing to gaffer to a leg.
Nothing to Mis-Wire
There is no polarity to get wrong at a joint and no connector that can be left unplugged behind a graphic. The failure mode becomes mechanical, which means it is visible and fixable in seconds rather than diagnosed with a meter.
Diagnosis Is Physical, Not Electrical
If a section is dark, press the joint. If it lights, the fault was seating. Only after every joint has been re-seated should anyone reach for a multimeter — and in practice that call almost never comes.
What is the rated mating cycle count of the electrical contacts?
Is the internal power supply serviceable in the field, or does the section need to be returned for repair?
Neither is usually printed in a catalogue, and both set the total cost of ownership across fifty shows.
7. Lighting Setup: The Five Settings That Decide How Expensive It Looks
The remote controls more than most buyers expect: a white base at 6500K with a cool/warm switch, seven static colours (orange, yellow, green, cyan, blue, purple, red), gradient transitions across the spectrum, dynamic and flashing modes, plus brightness, saturation and speed adjustment.
That range is also the problem. Left at factory defaults on demo mode, an RGB SEG lightbox display reads as a casino. Tuned, it reads as a brand asset. Five settings do most of the work.
Pick the nearest match to the primary, then adjust saturation until the border reads as the same colour family as the printed graphic rather than a neon approximation of it. Expect to reduce saturation — RGB primaries are more saturated than most brand palettes, and the untuned default always looks cheaper than the printed artwork beside it.
On a hybrid RGB Flash Lightbox the internal strips exist to make the artwork legible, not to tint it. Colour on the border, white on the face. The moment the internal light goes coloured, skin tones in product photography go wrong and colour-critical goods — apparel, cosmetics, packaged food — become unsellable in the image.
In a warm, low-ceiling retail space, a cool 6500K face against warm ambient light looks clinical. Switch to the warmer setting and the unit settles into the environment instead of fighting it.
Fast colour transitions beat against camera frame rates and produce banding that no amount of editing removes. For press photos and video, lock the frame to a static colour and the backlight to white. This is the single most common reason an otherwise good product photo comes back unusable.
A gradient that shifts over 30 seconds works in a showroom where people stand for minutes. In a trade hall where the average pass is four seconds, a static saturated colour outperforms any animation, because the eye registers colour faster than it registers change.
8. Where Setups Fail, and the Fix
Most RGB SEG lightbox problems can be traced to assembly, graphic installation, transport or lighting configuration. The following table provides a practical troubleshooting reference.
| Symptom | Real Cause | Fix |
|---|---|---|
| One section dark | Joint not fully seated, contacts not closed | Re-press until it clicks; check flush; retest |
| Dark or hot patch in the graphic | Graphic stretched from one corner | Re-seat the silicone edge from bottom centre, then corners, then midpoints |
| Frame will not sit flat | Frame out of square | Check diagonals; re-seat the short corner |
| Flicker or banding on camera | Dynamic mode running against the shutter | Static colour, white backlight, adjust shutter |
| Scuffed profile after two shows | Transported without the EVA case | Always case it — the case is part of the product, not packaging |
| Fabric creased along a fold | Graphic folded instead of rolled | Roll on a tube, store in the graphic bag |
Routine Maintenance Checklist
The maintenance schedule for a unit in regular use is genuinely short:
Wipe the aluminium profile clean.
Confirm every joint clicks securely into place.
Roll the graphics rather than folding them.
Keep two spare contact assemblies and one spare power section in the case.
That last item is what separates a contractor who never misses a build from one who occasionally does.
9. Three-Day Show Versus Six-Month Install
The same hardware behaves differently across the two extremes, and the preparation differs more than the assembly does.
For a Three-Day Exhibition or Trade Show
For a three-day show, the assembly is not the risk — the pack-out is. Build the frame once at the warehouse before the event, photograph the finished unit, and label every section with its position using tape that survives handling. Pack in reverse order of build so the base rail comes out first on site. On multi-booth jobs, keep one frame built as the reference unit for the crew.
For a Six-Month Retail or Showroom Installation
For a six-month retail or showroom install, assembly time is irrelevant and three other things matter.
Confirm the socket is reachable with the lead supplied and that the display can be isolated without moving it.
Check that the white point matches the ambient lighting, because it will be seen at every hour of the day rather than under show lighting.
Decide the graphic refresh cycle up front — the value of an SEG system in retail is that the hardware is reusable, which only pays off if the refresh is planned rather than improvised.
10. For Distributors: How to Stock It and How to Sell It
An RGB SEG lightbox display is an easier sell than a standard lightbox and a harder one to demonstrate from a catalogue. The stocking decision follows from that.
Stock by Carton Footprint, Not by Size Count
The 39.37 in family shares one packing size across all four heights, so four heights occupy one shelf position and the dealer can quote a matrix rather than a single SKU. The 118.11 in and counter units are separate logistics entirely.
Keep One Unit Built and Lit
An RGB product shown only as a printed photo competes on price. The same product lit in the corner of the showroom closes on the lighting question, because the buyer stops asking what the colours look like and starts asking what sizes it comes in.
Lead with the Tool-Free Build, Then the Weight
At 80 mm profile the frame is around 23% lighter than comparable systems, which moves it into a different courier band and cuts drayage on multi-unit orders. That argument lands with the operations manager, who is often the person quietly blocking the purchase.
Sell the Fabric as a Subscription, Not a Spare
Backlit SEG graphics are replaceable, and the standard BL16 fabric carries a B1 fire-resistant rating — a requirement that decides access at a large number of venues. Position the graphic as a recurring order and the hardware as the platform it runs on.
Give the Dealer the Naming Table from Section 1
Half the specification errors in this category come from a customer asking for an "RGB edge lighting box" when they need a backlit unit. One page of terminology prevents the return.
11. Frequently Asked Questions
Does the graphic light up on every RGB SEG lightbox display?
No. On an edge-only RGB frame the perimeter lights up and the graphic stays unlit. On a hybrid RGB Flash Lightbox, internal LED strips backlight the fabric on both sides. Confirm the model before promising an illuminated graphic.
What is the difference between an RGB Flash Lightbox and an RGB LED edge frame display?
The second is the hardware category — LED modules built into an aluminium profile that also carries the graphic channel. The first is a product-family name used for models with high-output dynamic lighting, some of which are backlit and some of which are not. Ask which model, not which term.
How long does assembly take?
The main frame of the large-format system is quoted at approximately three minutes once the team is familiar with it, and the counter unit is designed for under a minute. Allow 15 to 25 minutes for a first build on a mid-size frame with two people.
Do I need an electrician?
Not for a standard single frame: one mains lead, internal supply, no wiring at the joints. Larger multi-frame walls should follow local rules on circuit load and cable management, and venues often require the supply to be signed off regardless of the product.
Can I use blockout fabric instead of backlit fabric?
Yes on edge-only frames, and on single-sided configurations where you do not want light passing through. A hybrid backlit model needs backlit fabric to work as intended — blockout fabric in front of internal LED strips blocks the very light the model exists to produce. This is the one substitution that turns a working display into an expensive panel.
Can it be used outdoors?
These are indoor display systems. Rain, wind load and UV exposure are not what the profile, the electrics or the fabric are specified for.
What is the most common setup mistake?
Not checking the diagonals before fitting the graphic. An out-of-square frame cannot be fixed by tensioning the fabric, and the resulting complaint is always directed at the graphic rather than the build.
Need an RGB SEG Lightbox Display for Your Next Project?
Send us the wall width, the ceiling height, and whether the artwork needs to be lit or only framed in colour. We will come back with the matching model, the frame and packing dimensions, and an SEG template for your designer — usually the same working day.
EXPOMAX — RGB Flash Frame, RGB Flash Lightbox and RGB Lightbox Counter, shipped from stock sizes, MOQ 1.
Request a Custom RGB SEG Lightbox Quote






View More(Total0)Comment lists